|

MEHNDI RECIPIE:
preparing henna in a process that depends on your conscious application of concentration. Be aware of
your happiness. Be heartfelt. It effects the color entirely. It effects those to be adorned with the henna paste. It effects
the dance of the design. Gather the following ingredients: henna powder coffee/black tea lemons/lemon juice eucalyptus/clove/mustard
oil These are the basic ingredients. Other options are fenugreek seeds and/or okra in the boiled liquid mixture for a smoother
texture. Tamarind paste, cloves, beet juice in the boiled liquid mixture Before beginning let it be known: there are no exact
recipes for henna. And there are many ways to batch henna.
Basic rules for batching
1. Have the henna powder
pre-sifted. You will know if you need to sift the powder if there is small traces of sediment such as leaf stems and if it
feels grainy between your finger tips. Having a fine henna powder is mandatory for your sanity during application. Coarse
henna will not fit through your cone tip. Also, be sure you are using mehndi henna, not hair henna for best results. To sift
henna you will need a coffee can or an oatmeal container with a lid and a panty hose leg with toe. Place the toe halfway into
coffee can and pull the ends of the leg over the sides of the can. Place an ounce of henna into the toe. Cover the can and
shake until sifted. 2. Boiling hot, well strained liquids added to the henna increase color. 3. Mordents are chemical catalysts
that help activate the henna. They include lemon, black tea, camel urine [optional :)], clove (boiled with the coffee or tea).
Eucalyptus oil and mustard oil are heating oils and can open the pores of the skin to draw in henna color.
These
are the basic proportions:
1 part powder to 1 part boiling hot liquid As little as teaspoon per design/or tablespoon per
hand application is needed.
In more detail:
To 1/2 cup black tea (2 or 3 bags) or coffee mixture boiled down
dark
add 3T lemon juice. Whisk in a large bowl with an equal amount of henna powder. Add 5 drops of eucalyptus oil. Adjust
wet/dry ingredients until a yogurt like consistency occurs. Pour henna into a plastic freezer bag. Place henna in a dark place
to set. When the top layer turns dark green, the henna is activated and ready. This can take up to two hours. Peak color will
occur over the next 24 to 48 hours. Refrigeration will reserve coloring ability. Avoid exposure to air and light. Freezing
the henna will preserve the henna for months.
Freehand Designs: The Mehndi Cone
Altough there are different ways to apply henna besides the plastic homemade cone,
I have found the plastic cone to be the best and always available applicator for me. A brush, stick, syringe or jaquard craft
bottle are all alternative possibilities. Plastic pastry bags and mehndi application bags from India with plastic tips are
also ready for purchase.
To make a cone you will need:
heavy plastic sheeting(such as freezer bags)
2"
plastic packaging tape
scissors
1. Cut 7"-10" squares out of plastic freezer bags.
2.
Roll corner inside to create cone shape.
3. Wrap corner around cone.
3. Adjust cone until the point is closed, tape
flap.
When rolling a cone it needs to be closed as tight as possible at the tip. You can then determine your application
point once it is filled with henna. Simply trim a small tip off with scissors. Progressively trim more if necessary. Creating
at least several cones at a sitting is good idea.
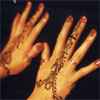
OUR DESIGNS
I welcome you the world of My Mehndi. I try to provide you with designs of your choice. I try to provide new designs every
year, and feel great joy when these designs are appreciated by you.
Some people do not like to put henna designs for
long time or are allergic to mehndi , for them I have mehndi which is temperory and will vanish the moment the hands are washed
The Mehndi designs are categorized by different names like:
Arabic Mehndi , Shaded Mehndi, Nail polish Mehndi, Jardosi
Mehndi ,Indian Mehndi

|